Showing posts with label Ikatan Tali. Show all posts

Knot Tying Instructions for Super Braid Fishing Line


Spectra Fishing Line Facts

Spectra fibre woven into superbraid is the ultimate fishing line for both kite fishing and deepwater jigging for hapuku, bluenose and bass. Many people ask how strong are nylon fishing lines compared to spectra? Incredibly spectra is only around one third the diameter of nylon for the same breaking strain, an important fact to consider when selecting fishing line for deepwater fishing or kite angling.

For example, a kitefisher using a pocket sled or flexiwing fishing kite rig can get three times as much spectra line on their fishing reel and fish three times as far offshore.

When using spectra lines kite fishers using dropper rigs will reduce the work the kite has to do to tow the rig out and keep the line clear of the water by two thirds. This is because the superbraid has only one third of the windage and weight of conventional monofilament or dacron fishing lines. Light wind performance is greatly enhanced.

Spectra braid is also kinder to fishing reels as it only has a stretch factor of around 1% while nylon can have a stretch factor of up to 30% (even dacron fishing line has a 10% stretch factor). Spectra is often called no stretch fishing line, superline, super braid fishing line or spiderwire to reflect it’s small fishing line diameter to strength ratio and low stretch.

When using more conventional fishing methods, such as deepwater fishing from boats for bass, hapuka and bluenose or other deepwater species. Unlike nylon fishing lines, bites can easily be felt even at great depths because of the incredibly low stretch of spectra and its ability to transfer every detail of the bite instantly to the angler.

It also works the other way round, those jigging in very deep water can easily impart real action to the jig or lure even at depths down to 200 metres and beyond. Obviously when the angler strikes, the strike is instantly and positively transmitted to the point of the hook ensuring maximum penetration and fewer missed strikes.

Probably the biggest benefit to deepwater rod and reel fishers is the spectra physics that come into play. Because it is so thin for it’s breaking strain you will only need a third of the amount of lead weight to hold the bottom in deep water or strong currents compared to those who use nylon fishing lines.

How to tie the Bimini Twist


1) Begin by making a loop and twist the line at least 20 times.
Depending on the length you wish to make the double, two people may be required.

2) Alternately, you may attach the double to something (use a cleat or a rod in a holder and place the line over the rod butt) if another pair of hands is not available. In this case stand inside the loop facing away from the rod, and towards the knot. Be careful of line damage at the end of the double if you do use this method.

This example shows a short double being made. The double end can be placed around the knee or your foot for a double a bit longer. Apply steady tension so the twists come together. Ensure that tension is maintained at all times.

3) Keeping tension on the standing end (line to the reel), relax slightly the tag end and let it run down over the original twist. This process can be assisted by placing a finger in the "v" at the bottom of the twist.


4) When the twists are completely wrapped, make a half-hitch around the right leg of the loop and pull tight. This will prevent the knot unraveling temporarily and allow you to proceed to the next step.


5) Complete the knot with a four turn locking hitch around both strands of the loop. Moisten the line with saliva and pull the tag end slowly. Use you thumb and forefinger to draw back the turns as you tighten them. Trim the tag end but leave enough line so the knot doesn't unravel, which may (unlikely if tied correctly) happen if it is constantly moving in and out of rod guides. The unraveling can be prevented by applying super glue to the knot. A rubber type glue such as Aquaseal or Pliobond is also very useful.


Always remember to test all knots before fishing

Make T knot


How to make T form's bond so that hook, float or pendulum no twist within itself.

Bagaimana hendak membuat ikatan bentuk T supaya mata kail, pelampung atau batu ladung tidak berbelit sesama sendiri.

Langkah 1 - Putarkan tangsi supaya ia terbentuk seperti dalam gambar 1. Ketika proses membentuk, pastikan hala pusingan tangsi berlawanan antara satu sama lain semasa menemukan tangsi ini – lihat anak panah.

Step 1 - Rotating catgut so that it formed as in picture 1. When process of forming, make sure round direction catgut counter between one same other during discover this catgut - see arrow.

Langkah 2 - Apabila membentuk 5 hingga 6 putaran, tegangkan kembali tangsi (seperti gambar 2) dan ketemukan semula lilitan tangsi yang dibuat ketika langkah 1. Proses ini bertujuan supaya lilitan menjadi lebih kemas dan rapat.

Step 2 - When form 5 to 6 revolutions, taut return catgut (such as picture 2) and again meet catgut circumference which made when move 1. This process aimed so that circumference become neater and close.

Langkah 3 - Ulangi langkah 1 dan 2 berulang kali sehingga lilitan yang dikehendaki cukup panjang. Biasanya panjang antara 15 hingga 25 sentimeter atau ukuran sejengkal jari dewasa.

Step 3 - Repeat move 1 and 2 repeatedly until circumference is wanted sufficiently long. Usually long between 15 to 25 centimetres or adult finger distance measure.

Langkah 4 - Berikutnya untuk mematikan simpulan dengan menyilang kedua-dua lingkar (loop) tali sambil jari telunjuk dan jari hantu digunakan sebagai index. Loop yang terbina perlu besar supaya memudahkan kita membuat langkah berikutnya.

Step 4 - Further to kill knot with cross both coil (loop) rope as forefinger and middle finger used as index. Formed Loop must be big so that facilitate we make next step.

Langkah 5 - Gunakan kedua-dua jari telunjuk untuk memutarkan loop yang terbina sebanyak 5 hingga 7 pusingan seperti gambar.

Step 5 - Use both forefinger to rotate loop built as much as 5 to 7 laps such as picture.

Langkah 6 - Apabila mencukupi 7 pusingan, masukkan hujung pintal ke dalam loop melalui tengah-tengah loop.

Step 6 - When enough 7 laps, include end twist into loop through middle loop.

Langkah 7 - Tegangkan tali seperti gambar 7. Sebelum memulakan regangan pastikan hujung pintal perlu ditegangkan sepenuhnya. Lakukan regangan dengan perlahan-lahan supaya ia membentuk sapu simpulan yang sekata. Gunakan pelincir seperti air liur (terbaik) semasa proses regangan ini supaya kita tidak mencalarkan tangsi semasa regangan dibuat.

Step 7 - Taut string-like picture 7. Before starting stretching make sure end twist must stretchy fully. Doing stretching gradually so that it form sweep regular knot. Use lubricant such as saliva (best) during this stretching process so that we no scratch current catgut stretching made.

Langkah 8 - Pasang mata kali pada hujung pintal seperti gambar. Contoh mata kail adalah jenis ‘Gamakatsu Octopus Circle Hook’.

Step 8 - Install multiply eye at end twist such as picture. Hook example was the type ‘Gamakatsu Octopus Circle Hook'.

Langkah 9 - Selesaikan pemasangan mata kail dengan memasukkan hujung mata pada hujung tali yang dipintal seperti gambar.

Step 9 - Solve hook installation by including distal in end of rope spun such as picture.

Langkah 10 - Contoh ikatan T yang siap. Mata kail berada kira-kira 15 sentimeter dari perambut utama dan regangan T dibuat supaya kedudukan mata jauh dari perambut utama.

Step 10 - T bond's example completed. Well off hook about 15 centimetres from perambut major and T's stretching made so that far points standing from perambut major.

Langkah 11 - Hujung tangsi digantung pemberat (ladung) dan hujung satu lagi disambungkan pada tali utama.

Step 11 - Catgut end suspended weight (bob) and another end attaches to main line.

Perambut pancing pantai memadai 1 meter


Panjang perambut untuk memancing di pantai memadai satu meter kerana jika terlalu panjang maka anda akan mengalami kesukaran untuk lontaran nanti (rujuk lakaran gambar untuk teknik perambut untuk pancing pantai).


Antara umpan pilihan untuk memancing pari ialah udang hidup, ketam angin, anak bebolos sebesar jari manis, sotong kurita, hirisan ikan selayang atau selar kuning, anak gelama, sotong dan udang pasar.

Long perambut to fish at the beach enough a metre because if too long thus you will experience difficulty for throwing later (refer picture sketch for technique perambut to hook coast).


Between choice bait to fish skate was live prawn, sand crab, child bebolos as big as ring finger, octopus, slices of sardine or yellow brand, sea fish spawn, market squid and prawn.

The Bimini Twist


The Bimini Twist is used primarily for offshore trolling, double-line leaders and connecting the main fishing line to shock tippits.


1) Measure a little more than twice the footage you'll want for the double-line leader. Bring end back to standing line and hold together. Rotate end of loop 20 times, putting twists in it.


2) Spread loop to force twists together about 10" below tag end. Step both feet through loop and bring it up around knees so pressure can be placed on column of twists by spreading knees apart.

3) With twists forced tightly together, hold standing line in one hand with tension just slightly off the vertical position. With other hand, move tag end to position at right angle to twists. Keeping tension on loop with knees, gradually ease tension of tag end so it will roll over the column of twists, beginning just below the upper twist.

4) Spread legs apart slowly to maintain pressure on loop. Steer tag end into a tight spiral coil as it continues to roll over the twisted line.

5) When spiral of tag end has rolled over column of twists, continue keeping knee pressure on loop and move hand which has held standing line down to grasp knot. Place finger in crotch of line where loop joins knot to prevent slippage of last turn. Take half-hitch with tag end around nearest leg of loop and pull up

6) With half-hitch holding knot, release knee pressure but keep loop stretched out tight. Using remaining tag end, take half-hitch around both legs of loop, but do not pull tight

7) Make two more turns with the tag end around both legs of the loop, winding inside the bend of line formed by the loose half-hitch and toward the main knot. Pull tag end slowly, forcing the three loops to gather in a spiral.

8) When loops are pulled up neatly against main knot, tighten to lock knot in place. Trim tag end about 1/4" from knot. These directions apply to tying double-line leaders of around five feet or less. For longer double-line sections, two people may be required to hold the line and make initial twist

Rapala Knot

This is an excellent line to lure connection that allows for good action on retrieval.


1. First, tie an overhand knot, leaving five inches of line with which to complete the knot, then pass the tag end through the lure's line-tie ring.


2. Next, pass the tag end back through the overhand knot.


3. Then wind the tag end three times around the standing part of the line.


4. Pass the tag end back through the overhand knot.

Shock Leader

This knot is used when adding a shock leader to your line. The line being added is usually of higher strength than what is spooled on your reel.


1. Run about 12 inches of your leader line on top of the spooled line. Make 5 wraps around your leader line and spooled line. Bring the tag end of the leader line through the loop formed by the wraps. Hold both lines and slowly pull the tag end tight.

2. Now run the free end of the spooled line about 12 inches over the leader line. Make 5 wraps around both lines and pull the tag end through the loop formed by the wraps. Hold both lines and slowly pull the tag end tight.

3. Wet the lines with saliva and pull slowly, holding the tag ends tight against the other line, in opposite directions until the knots butt against each other.

4. Make sure the knots are tight and clip the tag ends.

the best fishing knots.


This fishing knot uses the hangmans uni knot and is the knot most used by Paul's Fishing Kites for all the critical knotted joins in their kite fishing rigs and kite lines.

The best thing about this fishing knot is that it doesn't tighten up over time like a clinch knot or uni knot does and is ideal to use on surf fishing lines.

While other knots weaken the line over time, the catspawed hangmans uni knot will last for years without any maintenance required.

You will need to learn the hangmans uni knot before attempting this.

This knot is best tightened slowly while paying particular attention to how the line is laying while pulling it up.

You don't want to have any twists in the line or have the line crossing. A bit of practice is required.

To pull it up, put the clip over something fixed, such as a large nail.

Put light tension on the main line and slowly push the noose up to the clip.

This is truly one of the best saltwater fishing knots around and it is really worth taking the time to learn how to tie it properly.

Info Pancing:http://abusamah.com/fishing/

Tie Traces the Correct Length


For snapper fishing 1 metre 20 to 30 kg (40-50lb) traces are best.

Storing traces and terminal tackle on a rack or board has many advantages.

If you are using a longline or kite rig you will need a trace rack of some sort to store the many traces on.

Those using the sliding trace rig also find a rack helpful for storing spare traces and weight lines on.

Many fishers just like to have spare traces available for regular fishing with rods and reels.
The fishing line on traces that have been stored under tension on a rack are straight, kink and twist free and are a pleasure to use.
Keeping spare traces on a rack will reduce your fishing downtime if you get tangled with others, get snagged or are busted off by a big fish.

You can also bait the traces while they are on the rack.

Running repairs only mean seconds of lost fishing time rather than the many minutes it takes to completely re-rig your line from scratch.

The main question we get asked at Paul's Fishing Kites is, "how to tie a knot for fishing traces and get them all exactly the right length?"

The first thing you need to do is tie or snell all your hooks to traces that are around 300mm (12inches) too long.


Fishing knots and tips

1-Take one of the traces with a fish hook already snelled on and put the hook in the slot or over the nail on your rack where it will go when tied.

2-Put the clip and swivel in the opposite end of the rack where it will go.

3-Pull the trace towards the clip and cut the trace about 25mm (1 inch) beyond the swivel. On Paul's Fishing Kites racks simply cut flush with the inside of the rack as show

Tie fishing knot to length

Hang the rest of the traces with hooks on over a bar or clothes hanger and pull the traces gently until the hooks are lined up perfectly.

Pull the traces into a pony tail and cut them all to the same length of the first trace you cut.

All the traces with hooks on are all now the same length and we only need to get the tab end on the knot we tie to the swivel the same to have traces the perfect length.

The clinch knot (shown below) or an improved clinch (Looking at the diagram below it has the tab end turned towards you and is then passed back through the big loop) are the best knots for conrtolling the length of the tab end and are among the most popular monofilloment fishing knots.

Tighten a fishing knot trace

The trick is all in the pulling up of the knot.

*Tie the trace loosely to the swivel as shown in the top diagram below.

*Pinch the top of the swivel, the tab end and the last loop of the line firmly in your left hand while leaving a tab end of 25mm (1 inch).

*As you pull the knot up the tab end stays where you are pinching it and after tightening will still be 25mm long.

*Test your first trace on your rack and if it is a little loose add half an inch to the tab end for the rest of the traces.


Knot tying illustration - Improved Clinch Knot

Duncan's Knot Loop


Sometimes equivalent fishing-line type can be misleading especially to distinguish while it more complicating when involve fly fishing .
Peter Hayes, suggest knot Duncan Loop to facilitate bond when fishing way to soar.

1. Include major fishing-line on hole hook and make a skein.

2. Take fishing-line end part and then include into coil and belay to main line.

3. Repeat circumference until four or five times.

4. Kill knot by taking away end part and admitted in coil.

5. Then tidy up bond according to size that is required.

umpan lembut


Penggunaan isi ikan ada kalanya menyukarkan kerana ia mudah terburai terutama ketika dibaling ataupun dibawa arus. Oleh itu, simpulan yang sesuai diperlukan bagi mengelakkan umpan habis begitu saja.

1 - Ambil isi ikan yang biasa digunakan tetapi perlu dibuang kulit bagi membolehkan baunya menjadi tarikan untuk menjinakkan mangsa dan kemudian masukkan mata kail ke isi ikan berkenaan.

2 - Kemudian lilit tali tangsi yang nipis pada hampir keseluruhan umpan tadi.

3 - Putus tali terakhir melilit umpan tadi tetapi jangan sesekali membuat sebarang simpulan.

Translate To English:

SIMPULAN dropper loop


SIMPULAN dropper loop ini sesuai digunakan untuk memisahkan dua bahagian seperti mengasingkan antara batu ladung dan mata kail.


1. Lakukan satu gegelung untuk memulakan ikatan ini.


2. Pintal dalam bentuk gegelung yang kecil yang dipegang dengan dua tangan.


3. Lakukan hingga lapan lilitan pada salah satu bahagian dan satu lagi bahagian dengan menggunakan enam lilitan.


4. Gantung bahagian gegelung yang bersaiz besar dan tarik perlahan-lahan untuk memperkemaskan ikatan.


5. Ikatan yang sudah siap memiliki kekuatan yang diperlukan untuk memancing.

Simpulan Duncan’s Loop


ADAKALANYA jenis tali pancing yang sama boleh mengelirukan terutama untuk membezakan manakala ia lebih merumitkan apabila membabitkan memancing layang.
Peter Hayes, mencadangkan simpulan Duncan’s Loop untuk memudahkan ikatan ketika memancing cara layangan.

1. Masukkan tali pancing utama pada lubang mata kail dan buat satu gegelung.

2. Ambil bahagian hujung tali pancing dan kemudian masukkan ke dalam gegelung dan lilit pada tali utama.

3. Ulang lilitan sehingga empat atau lima kali.

4. Matikan simpulan dengan mengambil bahagian hujung dan dimasukkan dalam gegelung.

5. Kemudian kemaskan ikatan mengikut saiz yang diperlukan.

Translate To English

Mengikat WORLD’S FAIR

GARY Martin menggelarkan ikatan ini sebagai ‘World’s Fair Knot’ selepas memenangi 498 penyertaan di peringkat antarabangsa yang dianjurkan oleh Du Pont di Knoxville Amerika Syarikat pada 1982.


Simpulan ini juga dikenal pasti sukar terurai.

1. Buat gelung atau lapiskan tali dan kemudian masukkan bahagian hujung lipatan ke lubang mata kail.

2. Masukkan bahagian ke hujung lingkaran dan lakukan dua lapisan.

3. Kemudian lipatkan bahagian belakang dan masukkan ke bahagian bawah.

4. Ambil bahagain hujung tali dan lilitkan gelung dengan melakukan cara yang sebelum ini.

5. Kemudian tarik setiap simpulan untuk memperkemaskannya.

SIMPULAN PALOMAR

SIMPULAN Palomar mudah dilakukan. Ikatannya kukuh dan kemas sekali gus bersesuaian dengan pelbagai keadaan yang berkaitan dengan memancing. Ikut langkah satu hingga empat dan anda akan memiliki satu ikatan terbaik.


1. Buat gelung atau lapiskan tali pancing dan masukkan tali pancing ke lubang mata kail.

2. Buat satu simpulan dengan menggunakan hujung tali.

3. Tarik simpulan tali sehingga melebihi panjang mata kail.

4. Akhir sekali tarik tali utama dan kemaskan ikatan.

Simpul Darah Songsang

KEGAGALAN membuat ikatan atau simpulan yang betul berakhir dengan pemancing putih mata. Lazimnya mata kail terlucut dan ikan yang diidamkan meloloskan diri.Kali ini JORAN menampilkan simpulan darah songsang. Ia hampir sama simpulan darah namun ikatan yang dilakukan berganda untuk memastikan ikatan lebih kukuh. Simpulan dilakukan dalam keadaan songsang berbanding simpulan darah.

1. Pastikan ikatan pertama pada mata kail dilakukan dengan sempurna bagi memastikan ia dibuat dengan betul.

2. Ikatan pada mata kail dilakukan dua kali bagi memastikan ia tidak mudah lucut ketika memancing.

3. Kemudian, lakukan simpulan beberapa kali serta rapatkan setiap simpulan.

4. Selepas melakukan tiga simpulan, sulamkan tali itu ke pangkal dengan mengulangi ikatan yang sama.

5. Ulang ikatan yang sama sehingga simpulan pertama yang dilakukan pada mata kail.6. Ketatkan ikatan untuk memastikan ia betul-betul kemas.

Cara mengikat Tackle

Ini adalah satu simpul yang khas digunakan untuk mengikat satu tackle dengan satu ikatan kembar.

1 . Masukkan tali melalui lubang tackle.

2 . Putar separuh penghujung satu pusingan, letakkan satu pintalan yang tunggal antara berakhirnya gelung dan lubang tackle.

3 . Melalui gelung dengan pulasan atas tackle. Mengadakan berakhirnya gelung, bersama-sama dengan kembar, dengan tangan satu, dan memusingkan tackle untuk menyelusuri untuk menamatkan kembar gelung dibuat.

4 . Terus memegang gelung dan sempadan dengan tangan kanan. buat pusingan tackle melalui kedua-duanya gelung-gelung 6 kali atau lebih.Terus tekanan di kedua-dua bahagian garis kembar. Pembebasan gelung. ikatan tackle hidup dan gelung akan bermula untuk membentuk.

5 . Memegang tacklei dengan playar, tarik tali dengan kuat dan tolak gelung ikatan kearah lobang tackle bagi menguatkan ikatan

Sebentuk Mata Kail Snelling

Satu masalah kecil adalah kepelbagaian menamakan bahawa boleh digunakan untuk simpul satu, untuk umpamanya, seorang Nenek adalah satu Simpul yang Palsu, sekuntum Cengkih Sentakan adalah Simpul seorang Penambang, satu Simpul Ringkas adalah satu Ibu Jari Simpul. Tetapi apabila kami datang ke snelling sebentuk mata kail, nilon panjang tersangkut kepada cangkuk mungkin satu tangkas atau satu serungkup rambut.

Saya menemui kini yang pekerjaan sebenar mengikat serungkup rambut mungkin dipanggil tidur sebentar, manakala snelling kerap dengan cemburu terfikir tentang sebagai satu seni terbatas untuk nelayan lalat. Saya telah menangkap ikan dengan dasar nelayan di Terumbu Sawar Besar yang secara rutin tangkas pencangkuk-pencangkuk mereka.

Terbatas untuk garis-garis kekuatan pecah kurang daripada mengenai 20kg, proses adalah sederhana satu..


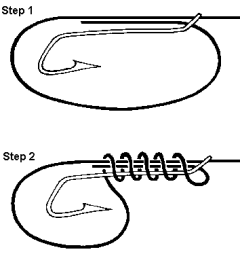
1 . Melalui berakhirnya talian, kesan atau purdah melalui mata dua kali, meninggalkan satu gelung tergantung di bawah cangkuk.

2 . Mengadakan baris-baris kedua-duanya sepanjang batang cangkuk.
Menggunakan gelung untuk menggulungkan ketat gelung-gelung sekitar batang dan kedua-dua baris, dari mata naik. Menggunakan daripada 5 untuk 10 pusing.

3 . Menggunakan anak jari mengadakan gelung-gelung ketat ini di tempat. Menarik talian (diperpanjangkan dari mata) sehingga gelung seluruh telah berlalu di bawah gelung-gelung ketat ini.

4 . Dengan gelung-gelung dibuat, menggunakan playar untuk menarik atas berakhirnya
talian.

Macam mana untuk Mengikat Snell Knot

Snell Knot adalah simpul baik dipilih bila memancing. Ia boleh digunakan oleh pemancing kerana ia digunakan kedua-dua mengakhiri talian untuk mengikatkannya.

Cara-cara untuk mengikat Snell Knot

1. Feed one end of the leader through the hook eye going 2-4 inches past the eye. Then feed the other end of the leader through the eye in the opposite direction. Hold the hook and leader ends between thumb and forefinger. Allow the excess leader to hang down in a large loop.
2. Holding the hook and leader in your left hand, grab this excess leader loop and the part of this loop close to the hook and wrap it over the hook shank and both ends of the leader toward the hook's barb. Go around the hook 7 or 8 times, keeping the newly made wraps contained and tight with your left thumb. Pull the short end of the leader that is through the eyelet with your right hand slowly, until the entire loop of leader feeds through it. Be sure to continue holding the 7 or 8 loops with your left hand so the knot will not unravel.
3. When it is almost tight, use your fingernails to slide it up against the eye of the hook. Finally, pull the short end of the leader and the standing line at the same time to completely tighten the knot. Trim the tag end.
4. Tying the Snell Knot is complete.


Followers